Sealcoating is most effective when the surface to be covered is clean, dry, and free of all debris. Sprinklers should be turned off for a full day before seal coating, and the area to be worked on should be blocked off with cones or barricades.
Asphalt is comprised of rock and gravel along with a binder. The binder is degraded by rain, UV rays, chemicals, and traffic. Sealcoating protects the binder and prolongs the life of asphalt-paved surfaces. Visit https://www.rochesternysealcoating.com/ to learn more.
Asphalt sealcoating is among the most crucial pavement maintenance tasks. It protects parking lots from environmental damage and prolongs their lifespan, saving businesses money in repairs and allowing them to make a great first impression on customers. However, if your business is to benefit from sealcoating, adequate preparation is essential for the process. Follow these five steps to ensure that your pavement is ready for a smooth coat of coal tar or asphalt emulsion.
A professional paving contractor will visually inspect the surface of your pavement before starting the sealcoating process. This allows them to spot cracks, potholes, and stains that need immediate attention. The assessment also helps determine whether the asphalt has had enough time to settle and cure, as well as the overall condition of your pavement.
It’s important that the parking lot or driveway be completely clear of debris prior to sealcoating. This includes leaves, dirt, loose pebbles, garbage, toys, cars, and other equipment. It’s also important that any vehicle fluids like oil, gasoline, and hydraulic fluid be washed away. These petroleum-based chemicals interfere with the bond of the new sealant, potentially lowering its quality. 3. Block off the area with barricades or cones to keep pedestrians and vehicles out of the way while the work is being done. This is also a good time to shut off sprinklers.
A proper sealcoat requires a few days of warm, dry weather after application to set properly. Rainy or extremely cold weather could damage the new coating before it has a chance to dry. If the weather looks iffy, reconsider the sealcoating and wait until conditions are better.
Aside from the weather, it’s important that all equipment, materials, and workers are in a safe location during the process. Your professional paving contractor will have barricades and safety tape to mark off the area that’s being worked on to keep everyone out of harm’s way while the sealcoat sets up. Having the right tools and knowing how to use them is important for an efficient sealcoating job.
Mixing
Sealcoating is a mixture of coal tar, asphalt emulsions, fillers and sand applied to the surface of an asphalt pavement to protect it. It is a cost-effective way to maintain your asphalt investment and extend its life by protecting it from damage caused by water, sun, chemicals and other materials used on the roadway. In addition, it can reduce the friction on your paved surface and make it safer for vehicle traffic.
Sealcoat is typically performed from spring through fall when weather conditions are ideal for the process. The surface must be dry and free of all debris, dirt, oil and other contaminants that could cause the sealer to fail before the application process begins. The temperature must be above 50 degrees and rising, and there should be no more than a 40% chance of rain during the application process.
Before starting, it’s important to prepare the area by removing all vehicles from the pavement and blocking off the entrances with cones or barricades. You will also want to protect borders, retaining walls and your garage door from getting any over spray during the process. Once the surface is prepared it’s time to start the mixing of your sealcoat.
Most asphalt sealers come in a container of concentrate that has to be mixed with water, sand and additives. The proportions of each can vary widely from manufacturer to manufacturer, and the sand must meet specific purity, gradation and chemical requirements.
To get the most out of your sealcoat, it is essential that you thoroughly mix all materials. If you don’t mix your material well, it is likely that the solids will settle at the bottom of the container and can get caught in the sealer gun’s spray tip, resulting in an uneven finish.
It is also important to note that the amount of sand/aggregate in your sealcoat mix can have an impact on performance. Increasing the amount of sand/aggregate will result in a tougher film with increased tensile strength, but this may also reduce the adhesive properties. It is recommended that the sand/aggregate not exceed 5-6 pounds per gallon of undiluted sealer.
Application
Asphalt pavement is made up of aggregate such as rock and stone and gravel, held together with a binder which comes from the distillation of certain crude oils. Over time, rain, sun and chemical penetration degrade the binder resulting in oxidation of the aggregate and a brittle surface. Seal coating preserves the binder, slows oxidation and protects the surface from water penetration, sunlight and other environmental factors.
The first step in any professional sealcoating job is to assess the asphalt surface. This involves searching for cracks, potholes, oil stains and other signs of deterioration that should be repaired immediately. The area is then cleaned thoroughly, to remove any dirt or debris that would compromise the quality of the final product. Once the repair work is complete, the blacktop must be completely dry before the sealcoat can be applied. Sprinklers should be turned off prior to application and vehicles should be removed from the site for at least 24 hours.
Next, the area is prepped for application by raking it level and blowing away any loose particles. This allows the finished product to adhere more securely to the pavement, ensuring a longer life expectancy.
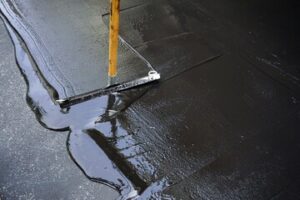
Once the area is ready, the contractor will choose between a squeegee or spray application. The spray method is quicker, and crews can cover larger areas in a fraction of the time it takes to use a squeegee. However, this method can leave a slightly thinner application and it is more likely that the spray will miss spots that would have been covered with the squeegee.
With the squeegee method, the contractors will fill buckets with the sealer and apply it directly to the paved surface. They will then use the squeegee to pack the material into the crevices and joints. The most effective way to do this is by using a ride-on sealcoating rig that has a squeegee attachment, or they can manually squeegee the asphalt. Both methods have their pros and cons, and employing both is a great option for achieving the best results. In addition to providing a stronger bond, the squeegee method allows the contractors to reach into corners and other hard to reach places where the spray might have missed.
Drying
Sealcoating can be messy, so it is important to take the time to ensure that the job is done right. This includes removing any excess material and cleaning up the area after the application is complete. Also, it is important to make sure that the area is dry before allowing traffic to begin using the surface again. This is because driving on a wet sealcoating can ruin the appearance and cause damage to the new coating.
When a pavement is properly maintained with regular sealcoating, it protects it from oil and fuel spills as well as chemical substances that will degrade the asphalt. The coating also helps to prevent cracking of the asphalt under vehicular pressure. In addition, it saves money in the long run by preventing the need for full replacement of the pavement.
Most sealcoatings are water-based and contain a significant proportion of water. After applying, this water leaves the sealer film as it dries and cures. The proper curing process allows the water to leave in a controlled manner, allowing the coating to reach its full strength. The climate and pavement surface conditions influence the rate at which this moisture leaves the coating.
This is important because a coating that dries too slowly or in cold weather conditions may not achieve a full cure. This will result in the formation of a gray color or film on the surface which reduces its performance. This problem can be eliminated through the use of special additives that accelerate the drying and curing process.
The type of additive used is important too. For example, rubberizing additives improve flexibility, durability and toughness while fast drying additives allow the sealer to dry quickly. Thickening additives help to build the viscosity of seal coats that have been diluted with large amounts of water. Follow the manufacturer’s recommendations when using these additives to achieve maximum performance from the product. It is also a good idea to avoid mixing different additives, as this could cause the viscosity to go haywire. If this happens, the warranty on the product may be voided.